Sunday, 17 March 2013

Installing VMware Update Manager

Note: Make sure vCenter 4 Server and vSphere client is installed and successfully running before trying to install Update Manager

vCenter Server and Update Manager require databases to store and organize server data. VMware recommends using separate databases for vCenter Server and Update Manager. For small deployments, a separate database for Update Manager might not be necessary, but is recommended. 

Please follow the steps to install vcenter server 4.1Installing VMware vCenter 4.1

1. vCenter Update Manager is on the second DVD of the vSphere suite. Once you insert the DVD it should autostart and present you with the vCenter Installer screen. Click on vCenter Update Manager

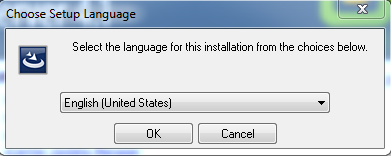
2. Select the language you wish to use. In this case we’ll be using English (United States). Click OK.

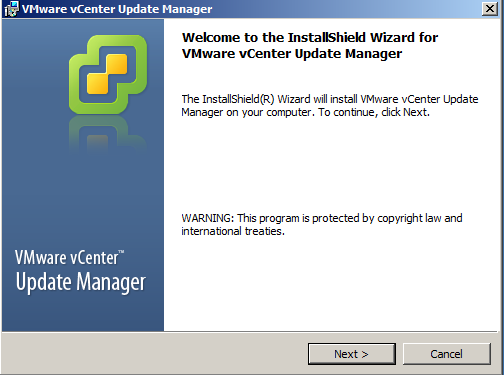
3. The installation wizard begins. Click Next.

4. Select “I agree to the terms in the license agreement” and click Next.

5. Enter in the IP address, HTTP Port, username and password of the vCenter server. If your HTTP port is different than the default port 80, enter in the correct port. There is no need to enter the username in the format of domain\username, as it will automatically use the domain membership of the server. Click Next.

6. Update Manager requires a database to store update information. You can either install a new Microsoft SQL Server 2005 Express instance, or use an existing supported database. I’ll select “Use an existing supported database” and select “VMware VirtualCenter (MS SQL) for the DSN name. Even though it uses the same instance a new database will be created. Click Next.

Please follow the steps to configure database for vcenter and Update Manager
How to Configure SQL Server for vCenter Server 4.1


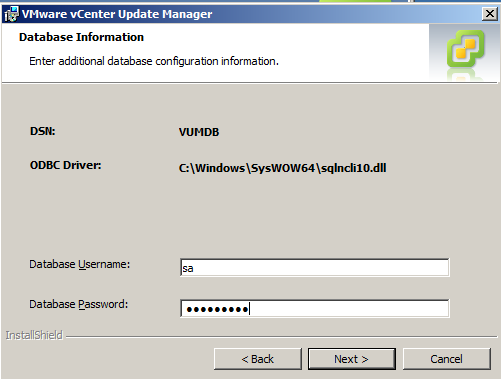
7. As we are using Windows Authentication for SQL we don’t need to enter anything at this screen. However if you are using SQL authentication, you can enter the username and password here: Click Next.

8. Select the correct vCenter Server IP address from the drop down menu. Check that the SOAP, Web and SSL ports don’t conflict with anything else on the server, if they do feel free to change them from the defaults. Take a screen shot or document these ports, as they will come in handy later. If you are accessing the internet via a proxy server, tick “Yes, I have Internet connection and I want to configure proxy settings now.” As we are accessing the internet directly and have no need to change any ports, we’ll click Next.

9. Choose which folder you would like to install Update Manager into and select which folder you would like to configure to hold the patch repository. Ensure you have enough free space on the patch repository drive. If you need would like to select a different folder for either option, click the Change button. We will use the default. Click Next.

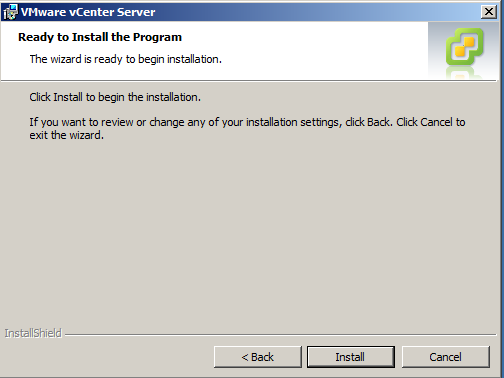
10. Now you are ready to begin the actual installation. Click Install.

Installing VMware vCenter 4.1

vCenter Server 4.1 does not support 32-bit host operating systems. For more information, see the Operating System Compatibility for vSphere Client, vCenter Server, and VMware vCenter Update Manager section of thevSphere Compatibility Matrix.
          Windows XP Pro SP2 (SP2 required, 64-bit)
          Windows Server 2003 (SP1 required, 64-bit)
          Windows Server 2008 (64-bit)
          Windows Server 2008 R2 (64-bit)

1. Inserting DVD 2 of the vSphere suite will present you with an autostart installation menu, displayed below. Ckuck vCenter Server.

2. Click on vCenter Server
3. Select the language you wish to use. In this case we’ll be using English (United States). Click OK.

4. The installation wizard begins. Click Next.


5. Select “I agree to the terms in the license agreement” and click Next.

5. Enter in your User Name, Organization Name and License Key for vCenter. If you don’t enter in the license key now for vCenter, it will be installed in evaluation mode and will run, fully functional for 60 days. You can enter in the license key before the evaluation period has expired. In this case, we’ll be running in evaluation mode, so we won’t be entering any license key here. Click Next.

6. At the database options screen, we have two options. The first option is to install a Microsoft SQL Server 2008 Express instance. This option will suite organizations with a maximum of 5 or fewer hosts and 50 or fewer virtual machines. Some other constraints of Microsoft SQL 2008 Express is a maximum database size of 4GB, only 1GB of memory usuable and lasly only one CPU usuable. The good news is that you can start with SQL 2008 Express and later upgrade to the full blown SQL 2008.

Microsoft SQL server Database Support:
Microsoft SQL Server 2005 Express (Note: Microsoft SQL Server 2005 Express is intended for use with small deployments of up to 5 hosts and/or 50 virtual machines)
Microsoft SQL Server 2005 Standard edition (SP1, SP2, SP3)
Microsoft SQL Server 2005 Standard edition (SP2, SP3) 64 bit
Microsoft SQL Server 2005 Enterprise edition (SP1, SP2, SP3)
Microsoft SQL Server 2005 Enterprise edition (SP2, SP3) 64 bit
Microsoft SQL Server 2008 Standard Edition
Microsoft SQL Server 2008 Standard Edition 64 bit
Microsoft SQL Server 2008 Enterprise Edition
Microsoft SQL Server 2008 Enterprise Edition 64 bit

6.1.2. Select Existing  Supported database. Data Source Name (DSN) : VCDB
Here my vcenter database is VCDB

Please follow the steps to configure database for vcenter and Update Manager
How to Configure SQL Server for vCenter Server 4.1

7. My Database User Name : sa
                          Password : *****

8. You can specify an account to run the vCenter services or use the default of SYSTEM. We’ll be using the default. Click Next.

9. Choose which path you would like to use for the vCenter installation and click Next.

10. In this section we are presented with two options that allow us to setup up vCenter as a standalone instance or to join an existing group. If this is your first vCenter installation and no other vCenter servers exist, you will select “Create a standalone VMware vCenter Server instance”. If you have already installed vCenter or your current vCenter server is at capacity you can select, “Join a VMware vCenter Server group using linked mode to share information”, which will install a second redundant/shared vCenter Server in the same linked mode group.

As this is our first and only vCenter server, we’ll be installing a standalone server instance. Click Next.

11. Displayed here are the default ports for vCenter. If you know of any conflicting ports, i.e. port 80 or 443, then you can change them here. Once you are happy with the information, make sure you create a screen shot or document which ports have been used, as they will come in handy later. Click Next.

12. Select as per requirement depends upon your environment.

13. Now you are ready to begin the actual installation. Click Install.

Note: To be able to administer vCenter you must install vSphere Client. To connect to the vCenter server, you must enter the IP address of the vCenter server in the client.

Friday, 8 March 2013

How to create ODBC Connection for vCenter and Update Manager

vCenter Server 4.1 installation required 64 bit ODBC connection

We must use a 64 bit DSN for vCenter Server and a 32 bit DSN for VMware Update Manager.

Path of 64 bit DSN for vCenter Server is  
Open the Control Panel --> Administrative Tools --> Open Data Sources ODBC

Path of 32 bit ODBC DSN for Update Manager is  
c:\Windows\System32\odbcad32.exe

First we now need to configure a system DNS entry for vCenter to use:
Open the Control Panel --> Administrative Tools --> Open Data Sources ODBC

1. Click the System DSN tab and click the "Add" button. Select the "SQL Native Client 10.0" driver and click "Finish"

2. Provide a Name to the data source (VCDB), disruption for database (vcenter database) and provide the hostname/IP of the SQL Server(SQL Server name: SQLSERVER) instance you created in the previous section in the Server field
3. Select the "SQL Server authentication" type and provide the login and password created from the "Configuring SQL Server for vCenter" section

4. Change the default database to the database created in the "Configuring SQL Server for vCenter" section (VCDB)

5. Click "Finish" to complete the setup

6. Click the "Test Data Source" button to validate the settings you provided

7. Assuming the test completed successfully, click the "OK" button
8. Click "OK" to complete the test

Creating ODBC Connection for (vCenter update Manager

1. vCenter Update manager required 32 bit DSN ODBC connection.
The path for 32 bit ODBC Connection is c:\Windows\System32\odbcad32.exe

2. Click the System DSN tab and click the "Add" button. Select the "SQL Server" driver and click "Finish".


3. Follow the previous steps from vcenter
Name: VUMDB
Description: vCenter Update Manager
Server: SQLSERVER

4. Select the "SQL Server authentication" type and provide the login and password created from the "Configuring SQL Server for vCenter" section
5. Change the default database to the database created in the "Configuring SQL Server for vCenter" section: (VUMDB)
6. Click "Finish" to complete the setup
7. Click the "Test Data Source" button to validate the settings you provided
8. Assuming the test completed successfully, click the "OK" button
9. Click "OK" to complete the test.


How to Install SQL Native Client Driver (64 bit)

Next topic is vCenter Server 4.1 is required 64 bit SQL Native Client Driver. Download sql client 64bit installed on vcenter host.

In the following section, we will install the SQL Native Client driver on the vCenter server. Let's begin:
1. On the SQL Server Install screen, select the "Run the SQL Native Client Installation Wizard" option
2. Click "Next" on the copyright notice screen.

3. Provide the appropriate Name and organization and click "Next"

4. Leave the defaults selected on the feature selection screen and click "Next"

5. Click "Install" to begin the installation on the vCenter server.

6. Click "Finish" to complete the install

How to Configure SQL Server for vCenter Server 4.1

Now i will explain about how to create database for both vCenter and Update Manager from SQL Server Management Studio..

Select Server type : Database Engine
Server Name : SQLSERVER
Authentication : Select SQL Server Authentication

I am going to create new login for vCenter and databases for vCenter (VCDB) and Update Manager (VUMDB)
Click Connect

We should create a new login for vCenter in order to access the databases. Select Security folder from Management studio.

Expand Security folder and right click on Login selecting “New Login” options

Provide a login name and password for vCenter and select the option SQL Server authentication. (Creating new login user is vcenter)

From the below image you can see from the new user login is created “vcenter”

From the object explorer window, right click on the “Database” folder and select “New Database”.

On the New Database window, provide a name for the database (here my vCenter server DB name is “VCDB”) and set the owner for the db is vcenter. (My vCenter DB owner is vcenter).

Check your vcenter Database name (VCDB) and Owner (vcenter). Press “OK”.

Now Create Update Manager Database (VUMDB)


Thursday, 7 March 2013

How to Install SQL Server 2008 R2 on WIndows Server 2008 R2 for vcenter server

I put the DVD into a drive (actually, I am using an ISO that I attached to the virtual machine) and right-clicked on the drive in My Computer and clicked “Install or run program from your media” SQL Server Setup installs the following software components required by the product:
       .NET Framework 3.5 SP1
        SQL Server Native Client
       SQL Server Setup support files
1. The first thing that happens when you launch the installation of SQL Server 2008 R2 is it checks for the proper framework. if it is not installed, it will install it for you. In my case, it adds ".NET Framework 3.5 SP1".

  2. On the next screen, click Installation on the left to display the installation options.We are then
       going to select New Installation or Add Features to an existing installation.

    3. On the Setup Support Rules you should be able to just click OK. If you click Show Details
    it will look something like this..
 

  4.  Enter your product key then click Next
  5. Accept the license agreement click Next
  6. On the Setup Support Files click Install
  7. On the Setup Support Rules screen, you can see that I have a couple warnings


    The .NET warning is that I do not have Internet access on this computer. Not a problem so I am   
     just  moving on.
   
    The Firewall warning will be ignored as well. I will go back and modify the firewall later.I will   
    just click Next and move on

8.On the Feature selection, I am going to Turn on few options.. Click Next

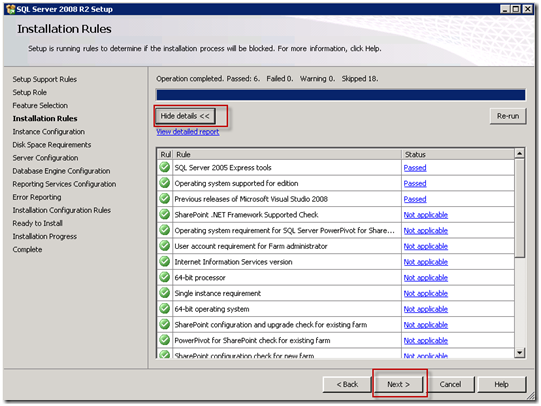
9. On the Installation Rules you can click "Show Details" if you like then just click Next
 
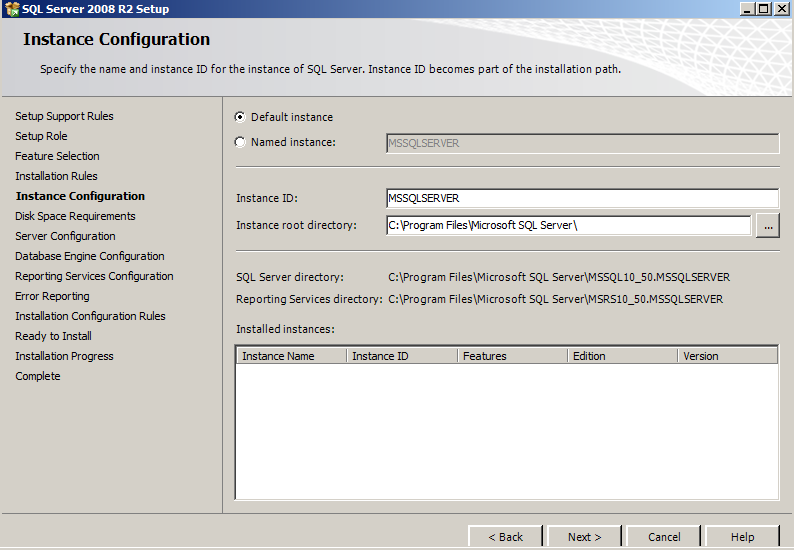
10. Next is the Instance configuration…

 11. Leave default settings and press Next..

 12. On the Disk Space Requirements Screen just click Next

We are going to use the same account for all of our services. just click on the Use the same account for all SQL server Services button to bring up a small dialog box. In the Account Name field select NT Authority\SYSTEM then click OK

We will keep the defaults for Collation so just click Next

On the Database engine configuration Page we have much to do…

On the Account Provisioning tab I am changing to Mixed Mode. This gives me the capability to manage users from inside of SQL. Without it users have to use Windows authentication. Once you change to mixed mode you will need to put in a password for the “sa” account which is the internal SQL Administrator account. You will need to use a complex password for this. If you do not need mixed mode, you can just leave Windows authentication mode turned on.

You have to specify SQL Server administrators. In my case, I clicked “Add Current User” which added esxstuff\Administrator. I also clicked Add to add Woodgrovebank\Domain admins and Woodgrovebank\SQL2008R2Service which is a user account I created for SQL Server. I am not initially using this account but I want to go ahead and make it an administrator.

   
 13. Just click Next and Select In the Reporting Services configuration, I will leave Install the native    
   mode default configuration and then click Next
  Then Click Next

Almost done. You can show the details on the Installation Configuration Rules if you like all applicable tests should be passed so just click Next

14. On the Ready To install screen you can review your configuration and then just click Install
Then just let it chug for about 20 mins or so (depending on performance of your machine it could be longer)